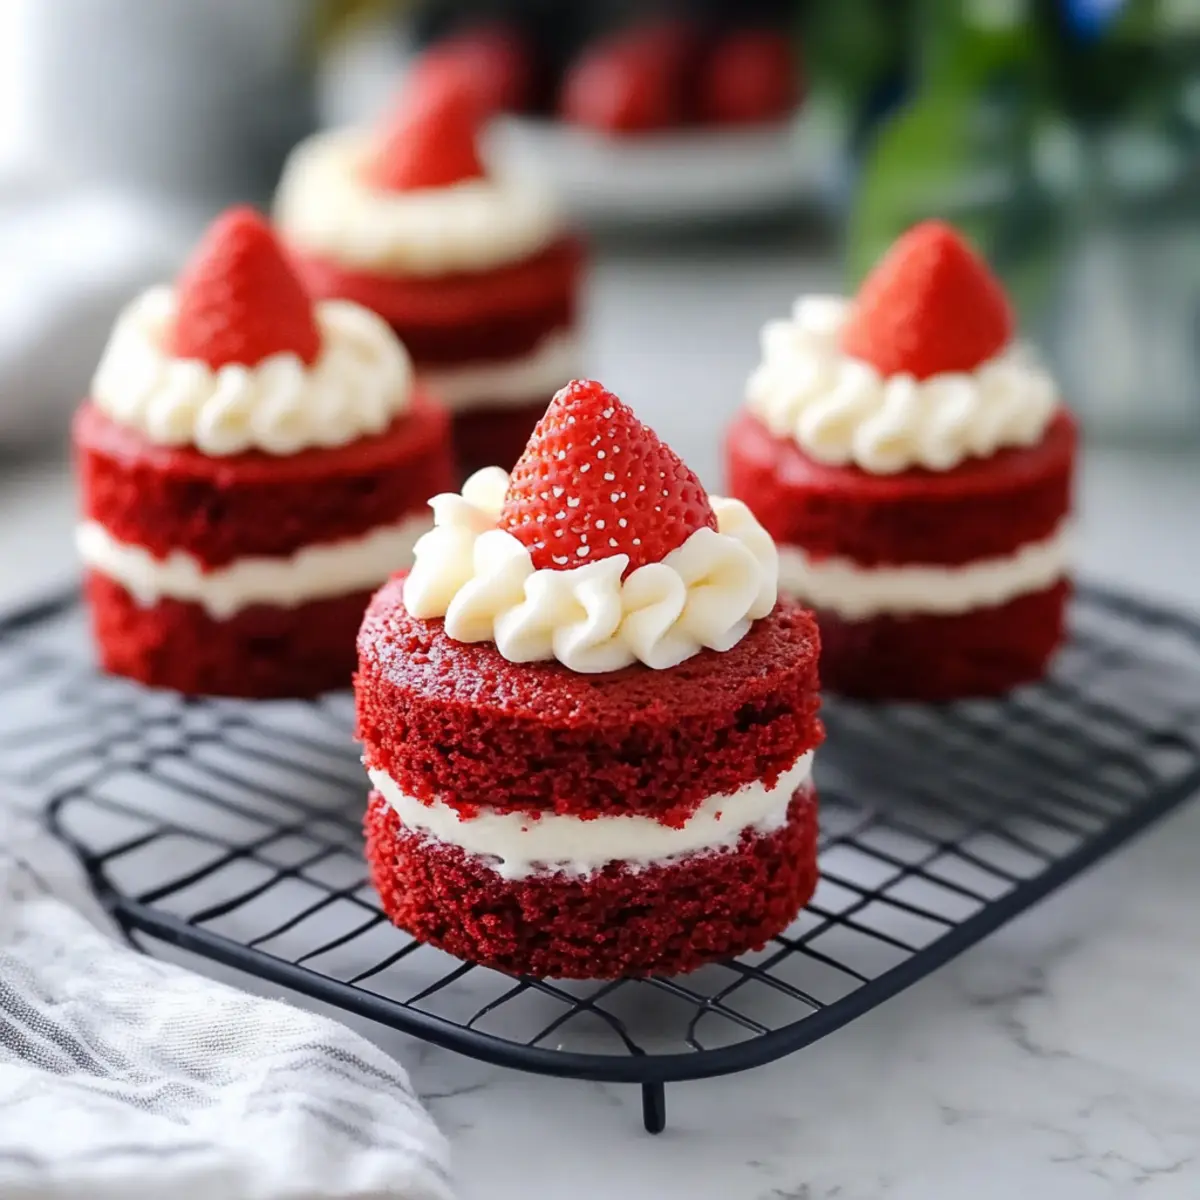
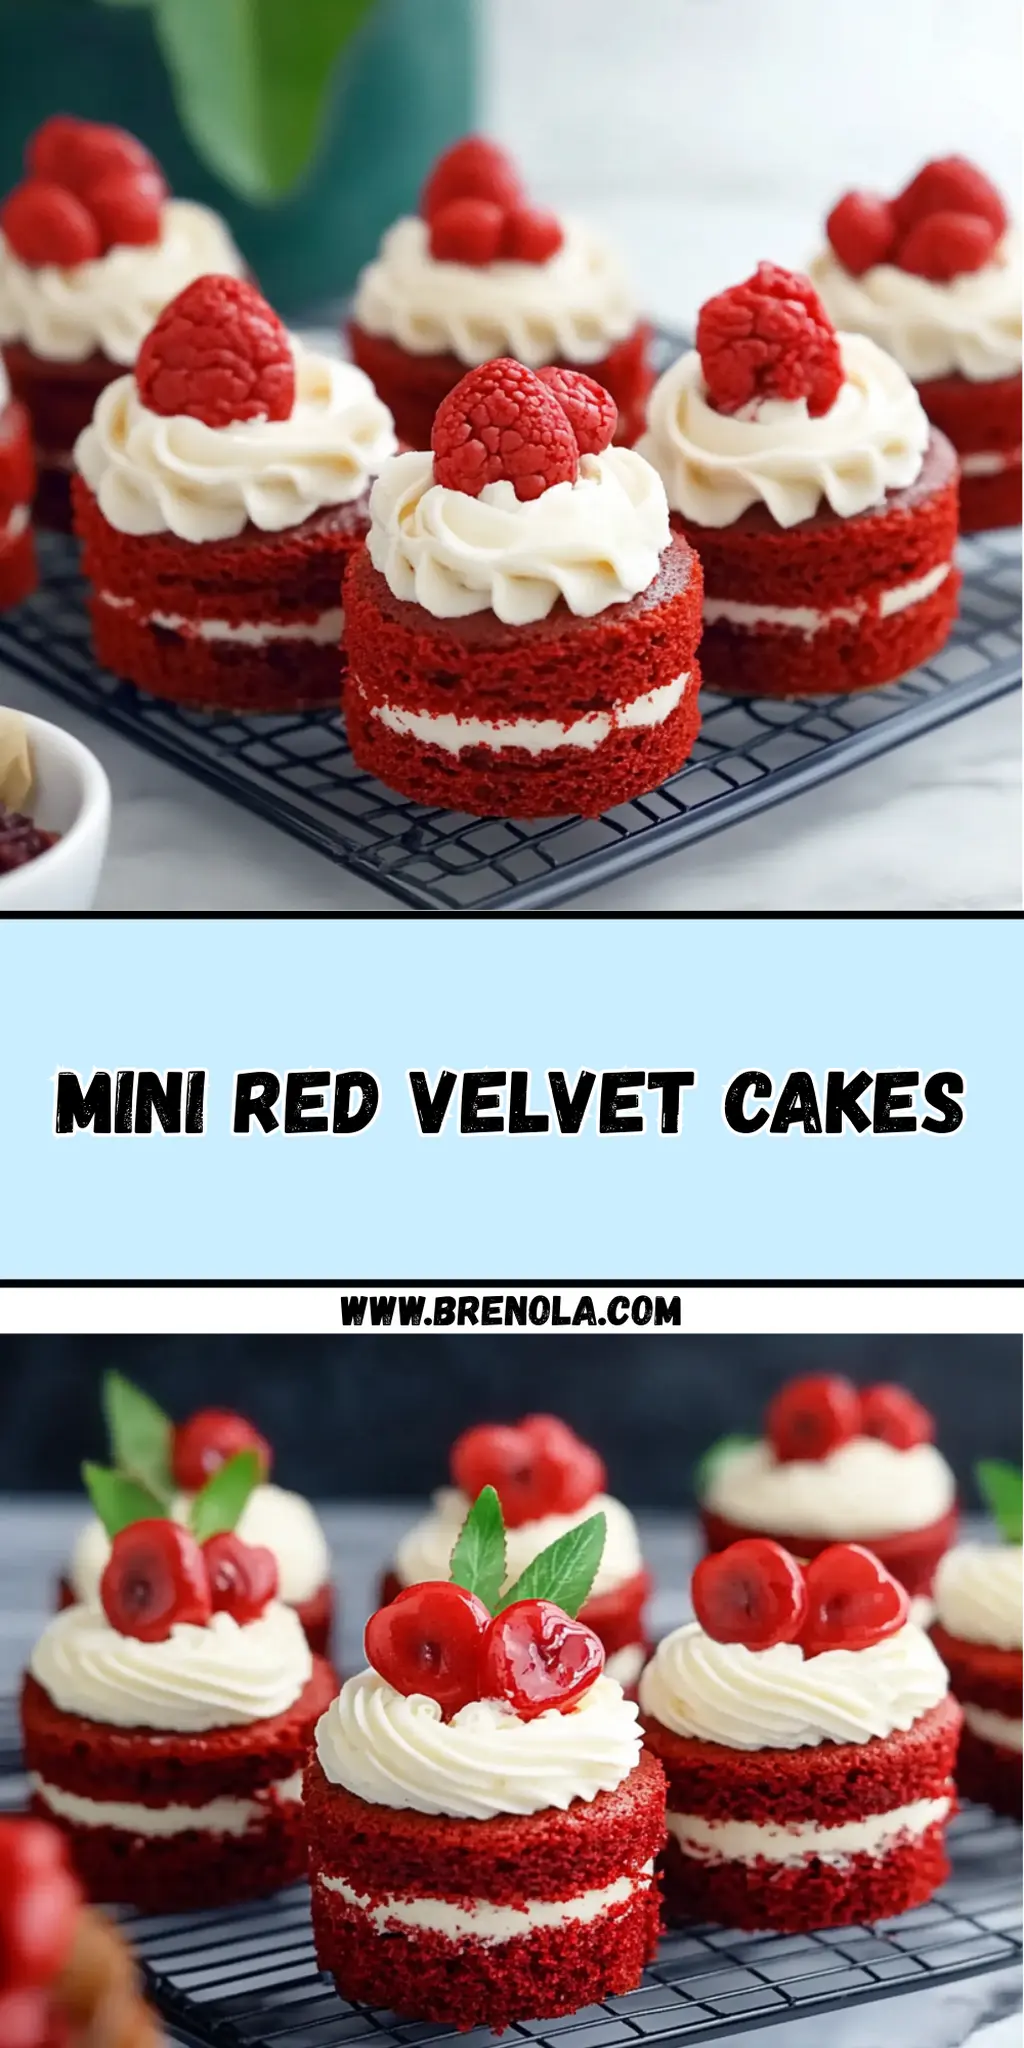
As the weather cools and cozy gatherings become the norm, I find myself reaching for recipes that evoke warmth and joy. That's when my Mini Red Velvet Cakes come to life, infusing every bite with a playful elegance that won't break the bank or stress the kitchen. Picture this: soft, fluffy cake layers kissed with the sweetness of buttermilk and the distinct flirt of cocoa, topped with a luscious blend of cream cheese and mascarpone. Not only are they delightful to eat, but they also present beautifully—making them perfect for any occasion.
Whether it’s a relaxed afternoon tea or a festive celebration, these mini cakes are sure to impress your family and friends, transforming even a mundane weeknight into something special. Plus, with a prep time of just 20 minutes, whipping up these treats is as enjoyable as savoring each bite. Join me in rediscovering the timeless classic that is red velvet with this easy yet impressive recipe—because life’s too short for boring desserts!
Why You'll Love This Mini Red Velvet Cakes
- These Mini Red Velvet Cakes are not only easy to make but also rich in flavor, combining the perfect balance of sweetness and cocoa.
- With just 20 minutes of prep time, they are a fantastic time-saving dessert that allows you to spend more time with your loved ones.
- The vibrant color and elegant presentation make them visually appealing, ensuring they will be the star of any dessert table.
- Their versatility means you can enjoy them at tea parties, birthdays, or festive gatherings, pleasing both kids and adults alike.
Mini Red Velvet Cakes Ingredients
Get ready to bake a delightful treat!
For the Cake
• All-purpose flour – essential for the structure of these fluffy cakes.
• Unsalted butter – creates a rich and creamy texture.
• Sugar – adds just the right sweetness to balance the cocoa flavor.
• Large eggs – bind the ingredients together for a moist cake.
• Buttermilk – provides moisture and a slight tang that enhances the flavor.
• Baking powder – ensures your cakes rise beautifully.
• Cocoa powder – gives a subtle chocolate flavor while keeping that iconic red velvet touch.
• Salt – elevates the flavors and brings out the sweetness.
• Red food coloring – gives these mini red velvet cakes their signature appearance.
• Vanilla powder – infuses a sweet aroma that complements the other flavors.
For the Cream Filling
• Cream cheese (Philadelphia) – adds a rich, tangy smoothness.
• Mascarpone – enhances creaminess and brings a delightful texture.
• Softened cow’s butter – ensures a silky, spreadable consistency for the filling.
• Powdered sugar – sweetens the cream base while dissolving smoothly.
For the Garnish
• Fresh strawberries or raspberries – add a burst of freshness and color, perfect for presentation.
• Fresh mint leaves – elevate the look and add a refreshing aroma to each bite.
Now you're all set to create these stunning Mini Red Velvet Cakes that are sure to impress!
How to Make Mini Red Velvet Cakes
-
Preheat the Oven: Begin by setting your oven to 170°C (338°F). Line a 40×42 cm (16–17 inch) tray with baking paper to prevent sticking.
-
Sift Dry Ingredients: In a bowl, sift together the all-purpose flour, cocoa powder, salt, and vanilla powder. This aerates the mixture, ensuring your cakes are as fluffy as can be!
-
Cream Butter and Sugar: In another bowl, beat the unsalted butter and sugar together until fluffy and light in color—this should take about 3-5 minutes.
-
Add Eggs: Crack in the large eggs one at a time, mixing well after each addition. This helps create a smooth and cohesive batter.
-
Prepare Red Batter: Combine 2 tablespoons of the batter with red food coloring and 1 tablespoon of buttermilk in a small bowl; set this colorful goodness aside for later.
-
Combine Mixtures: Gradually add the sifted dry ingredients to the butter-sugar mixture, alternating with the buttermilk. Mix gently until just combined—overmixing can make the cakes tough!
-
Spread and Bake: Pour the batter evenly into your prepared tray and bake for approximately 20 minutes, or until a toothpick comes out clean. They’ll turn a lovely golden color.
-
Cool on Rack: Once baked, cool the cakes completely on a wire rack. This helps maintain their fluffy texture as they cool.
-
Make the Cream Base: In a mixing bowl, beat together the softened cow’s butter and powdered sugar until smooth—no lumps allowed!
-
Mix Cream Cheese and Mascarpone: In a separate bowl, blend the cream cheese and mascarpone until creamy and well combined, creating that delicious filling.
-
Combine Cream Mixtures: Gently fold the smooth butter mixture into the cream cheese mixture. Then, transfer it to a piping bag fitted with a 6 mm round tip for easy decorating.
-
Cut Out Circles: From your cooled cakes, cut out 16 circles (7 cm in diameter). This is where the magic happens!
-
Pipe Cream Filling: Pipe the cream onto 8 of the cake circles, then top with the remaining circles, adding another dollop of cream on top for a lovely layer.
-
Chill in the Fridge: Place the assembled cakes in the refrigerator for several hours to chill. This helps the flavors meld beautifully.
-
Bring to Room Temperature: Before serving, take the cakes out and let them sit at room temperature for about 15 minutes—this brings out their wonderful flavors.
-
Garnish: Lastly, adorn each mini cake with fresh strawberries or raspberries along with a mint leaf for an extra touch of elegance.
Optional: Dust with powdered sugar before serving for a beautiful finish.
Exact quantities are listed in the recipe card below.
What to Serve with Mini Red Velvet Cakes?
Imagine savoring each delightful bite while pairing it with the perfect accompaniments that elevate your dessert experience.
-
Creamy Vanilla Ice Cream: Adds a cool, creamy contrast to the rich flavors of the cake, enhancing its delightful taste. The creaminess melts beautifully in your mouth alongside the velvety texture of the cakes.
-
Fresh Berries Medley: A mixture of strawberries, raspberries, and blueberries brings a burst of freshness and a touch of tartness that complements the sweetness of the red velvet.
-
Rich Hot Chocolate: This warm drink's chocolatey depth mingles well with the cocoa notes in the cakes, providing a cozy and indulgent experience during chilly evenings.
-
Sparkling Strawberry Lemonade: The fizz and citrus-y brightness refreshes your palate, balancing the sweetness of the mini cakes while making your dessert feel festive.
-
Coffee or Espresso: A strong cup of coffee's bitterness can enhance the cake's sweet and creamy flavors, creating a perfect harmony of taste. It's an ideal way to enjoy a delightful afternoon treat.
-
Chocolate Ganache: Drizzle or dip your red velvet cakes in velvety chocolate ganache for an extra creamy richness that makes these cakes even more decadent.
-
Mint Tea: The refreshing herbal notes of mint tea offer a light finish to your meal, cleansing the palate after indulging in the sweet, rich flavors of the mini cakes.
-
Whipped Cream Topping: A dollop of lightly sweetened whipped cream adds a fluffy goodness that contrasts beautifully with the dense cream filling, creating an indulgent treat.
-
Caramel Sauce: Drizzle a bit of warm caramel sauce over your mini red velvet cakes for an extra touch of sweetness that enhances their festive flair. You’ll love the rich, buttery flavor!
How to Store and Freeze Mini Red Velvet Cakes
Fridge: Keep the mini red velvet cakes in an airtight container in the refrigerator for up to 3 days. This helps maintain their freshness and flavor.
Freezer: For longer storage, wrap each mini cake individually in plastic wrap and place them in a zip-top freezer bag. They will last for up to 3 months.
Thawing: To enjoy your frozen cakes, simply transfer them to the fridge overnight or let them sit at room temperature for about 1 hour before serving.
Reheating: If you prefer warm cakes, briefly microwave them on low power for 10-15 seconds. Then, add your fresh berries right before serving for extra delight!
Make Ahead Options
These Mini Red Velvet Cakes are perfect for busy home cooks looking to streamline their meal prep! You can prepare the cake layers up to 24 hours in advance; simply cool them completely and wrap them tightly in plastic wrap before refrigerating. For the cream filling, mix your cream cheese and mascarpone elements a day ahead as well, storing them in an airtight container in the fridge. When you're ready to serve, just cut the circles, assemble the cakes, and refrigerate them for a few hours to chill. Bring the cakes to room temperature for about 15 minutes before garnishing with fresh strawberries or raspberries and mint leaves, ensuring they remain just as delicious and delightful!
Mini Red Velvet Cakes Variations
Feel free to get creative with your Mini Red Velvet Cakes and make them your own!
-
Gluten-Free: Substitute all-purpose flour with a 1:1 gluten-free blend for a similar texture without gluten.
-
Dairy-Free: Use coconut oil instead of butter and almond milk with vinegar to replace buttermilk for a delicious dairy-free alternative.
-
Chocolate Lovers: Add an extra tablespoon of cocoa powder to the batter for an even richer chocolate flavor.
-
Lemon Zest: Incorporate a teaspoon of freshly grated lemon zest in the cream filling for a bright citrus twist that cuts through the sweetness.
-
Spiced Red Velvet: Add a pinch of cinnamon and nutmeg to the dry ingredients for a warm, aromatic flavor that enhances the richness.
-
Coconut Cream: Swap the mascarpone with whipped coconut cream for a tropical flair and vegan-friendly treat.
-
Nutty Add-In: Fold in some chopped walnuts or pecans into the batter for added crunch and texture that complements the soft cake.
-
Peppermint Twist: Use peppermint extract instead of vanilla in the cream for a refreshing holiday twist that will leave guests longing for more.
Let your taste buds guide you as you explore these exciting variations!
Chef's Helpful Tips
- When making Mini Red Velvet Cakes, ensure that your butter and eggs are at room temperature for better incorporation into the batter.
- One common mistake is overmixing the batter after adding the dry ingredients; mix just until combined to keep your cakes light and fluffy.
- For a vibrant red color, make sure to use quality red food coloring, as some brands may be less effective.
- Always allow your cakes to cool completely on a wire rack before cutting out the circles to prevent them from becoming mushy.
Mini Red Velvet Cakes Recipe FAQs
What is the best way to choose ripe ingredients for the cake?
Absolutely! When selecting ingredients, ensure your buttermilk is fresh and slightly chilled—it will lend moisture and flavor. For butter, look for a creamy, smooth texture with no dark spots. Using large eggs ensures the best binding for your cakes; always crack them open to check for freshness.
How should I store my Mini Red Velvet Cakes?
To keep your mini red velvet cakes fresh, store them in an airtight container in the refrigerator for up to 3 days. This preserves their delightful texture and flavor. If you notice any dark spots on the cream cheese filling, it’s best to discard that part to maintain quality.
Can I freeze Mini Red Velvet Cakes?
Yes! For freezing, wrap each cake individually in plastic wrap and place them in a zip-top freezer bag. They will stay fresh for up to 3 months. When you're ready to enjoy them, simply transfer your cakes to the fridge for about 6 hours or leave them at room temperature for approximately 1 hour to thaw.
What are some common troubleshooting tips for baking?
Very! One common issue is if your cakes sink in the middle; this usually happens due to overmixing the batter or opening the oven door too early. Ensure all ingredients are at room temperature before mixing and only blend until just combined. If your cakes are too dry, they may have been overbaked, so keep an eye on them during the last few minutes!
Are there any dietary considerations for Mini Red Velvet Cakes?
The more the merrier! If you have guests with dietary restrictions, consider using gluten-free flour and dairy-free cream cheese as alternatives. Always double-check the labels for allergens, especially for the red food coloring, as some may contain gluten or other allergens.
How can I make the cakes more visually appealing for special occasions?
Absolutely! Consider topping your mini cakes with a light dusting of powdered sugar or drizzling melted chocolate over them for a touch of decadence. You can also play with the garnish—using edible flowers or a mix of berries can elevate the visual appeal, making them perfect for celebrations!
Mini Red Velvet Cakes
Ingredients
Equipment
Method
- Preheat the Oven: Set your oven to 170°C (338°F) and line a baking tray with baking paper.
- Sift Dry Ingredients: In a bowl, sift together all-purpose flour, cocoa powder, salt, and vanilla powder.
- Cream Butter and Sugar: Beat together the unsalted butter and sugar until fluffy and light in color (3-5 minutes).
- Add Eggs: Mix in the large eggs one at a time until fully incorporated.
- Prepare Red Batter: Combine 2 tablespoons of the batter with red food coloring and 1 tablespoon of buttermilk in a small bowl; set aside.
- Combine Mixtures: Gradually mix the sifted dry ingredients into the butter-sugar mixture alternating with the buttermilk until just combined.
- Spread and Bake: Pour the batter into the tray and bake for approximately 20 minutes, or until a toothpick comes out clean.
- Cool on Rack: Allow the cakes to cool completely on a wire rack.
- Make the Cream Base: Beat together the softened cow’s butter and powdered sugar until smooth.
- Mix Cream Cheese and Mascarpone: Blend the cream cheese and mascarpone until creamy and well combined.
- Combine Cream Mixtures: Gently fold the butter mixture into the cream cheese mixture and transfer to a piping bag.
- Cut Out Circles: Cut out 16 circles (7 cm in diameter) from the cooled cakes.
- Pipe Cream Filling: Pipe cream onto 8 cake circles, and top with the remaining circles. Add another dollop of cream on top.
- Chill in the Fridge: Refrigerate the assembled cakes for several hours.
- Bring to Room Temperature: Let the cakes sit at room temperature for about 15 minutes before serving.
- Garnish: Adorn each mini cake with fresh strawberries and mint leaves.


Leave a Reply