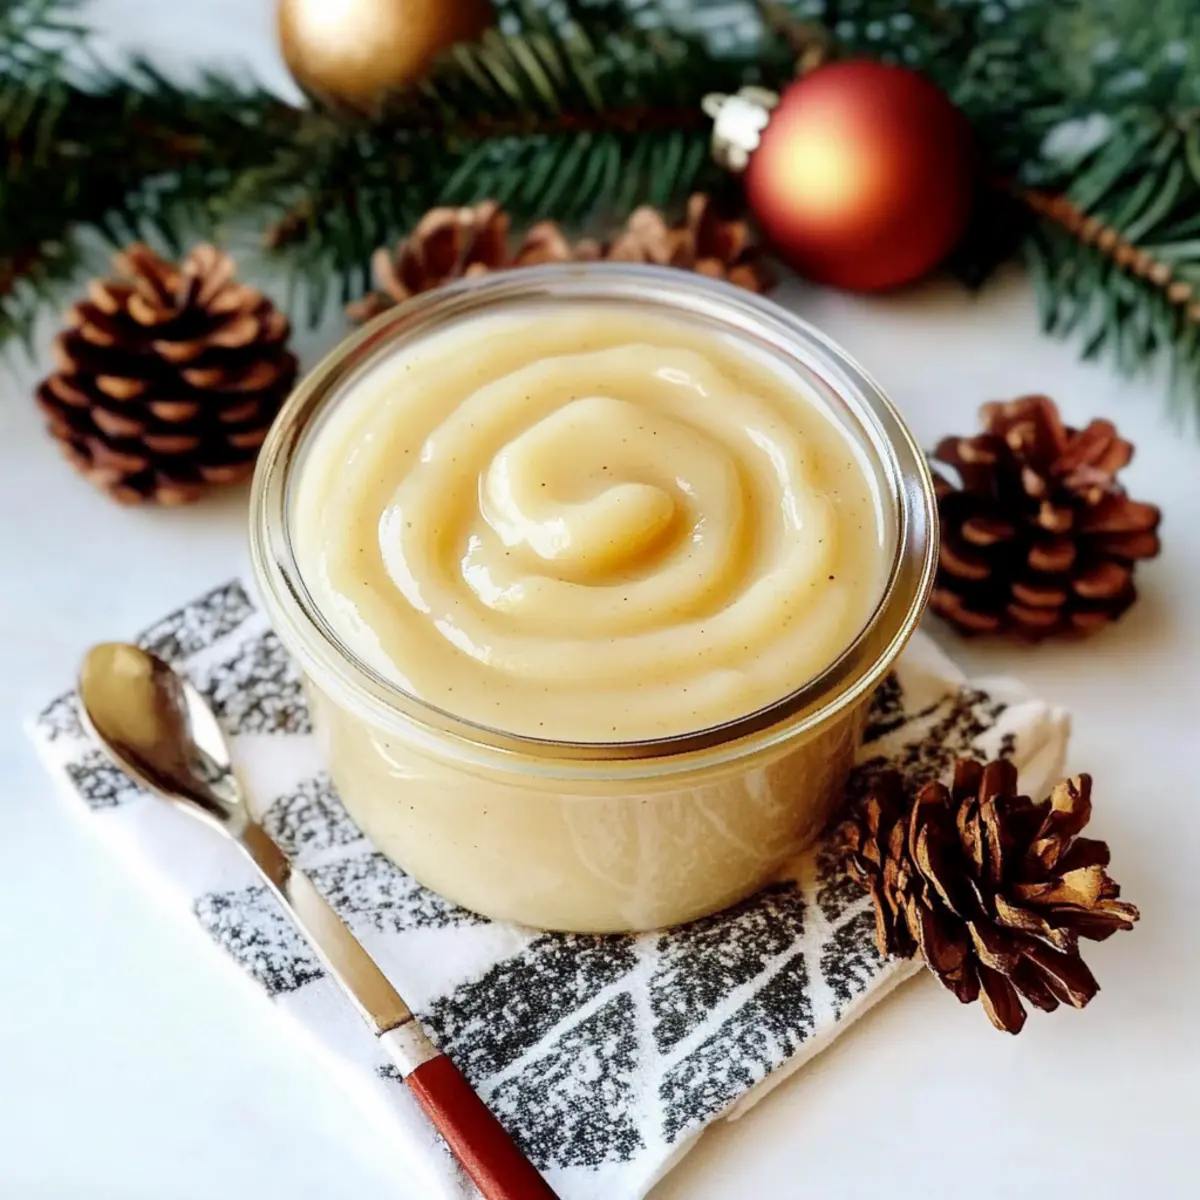
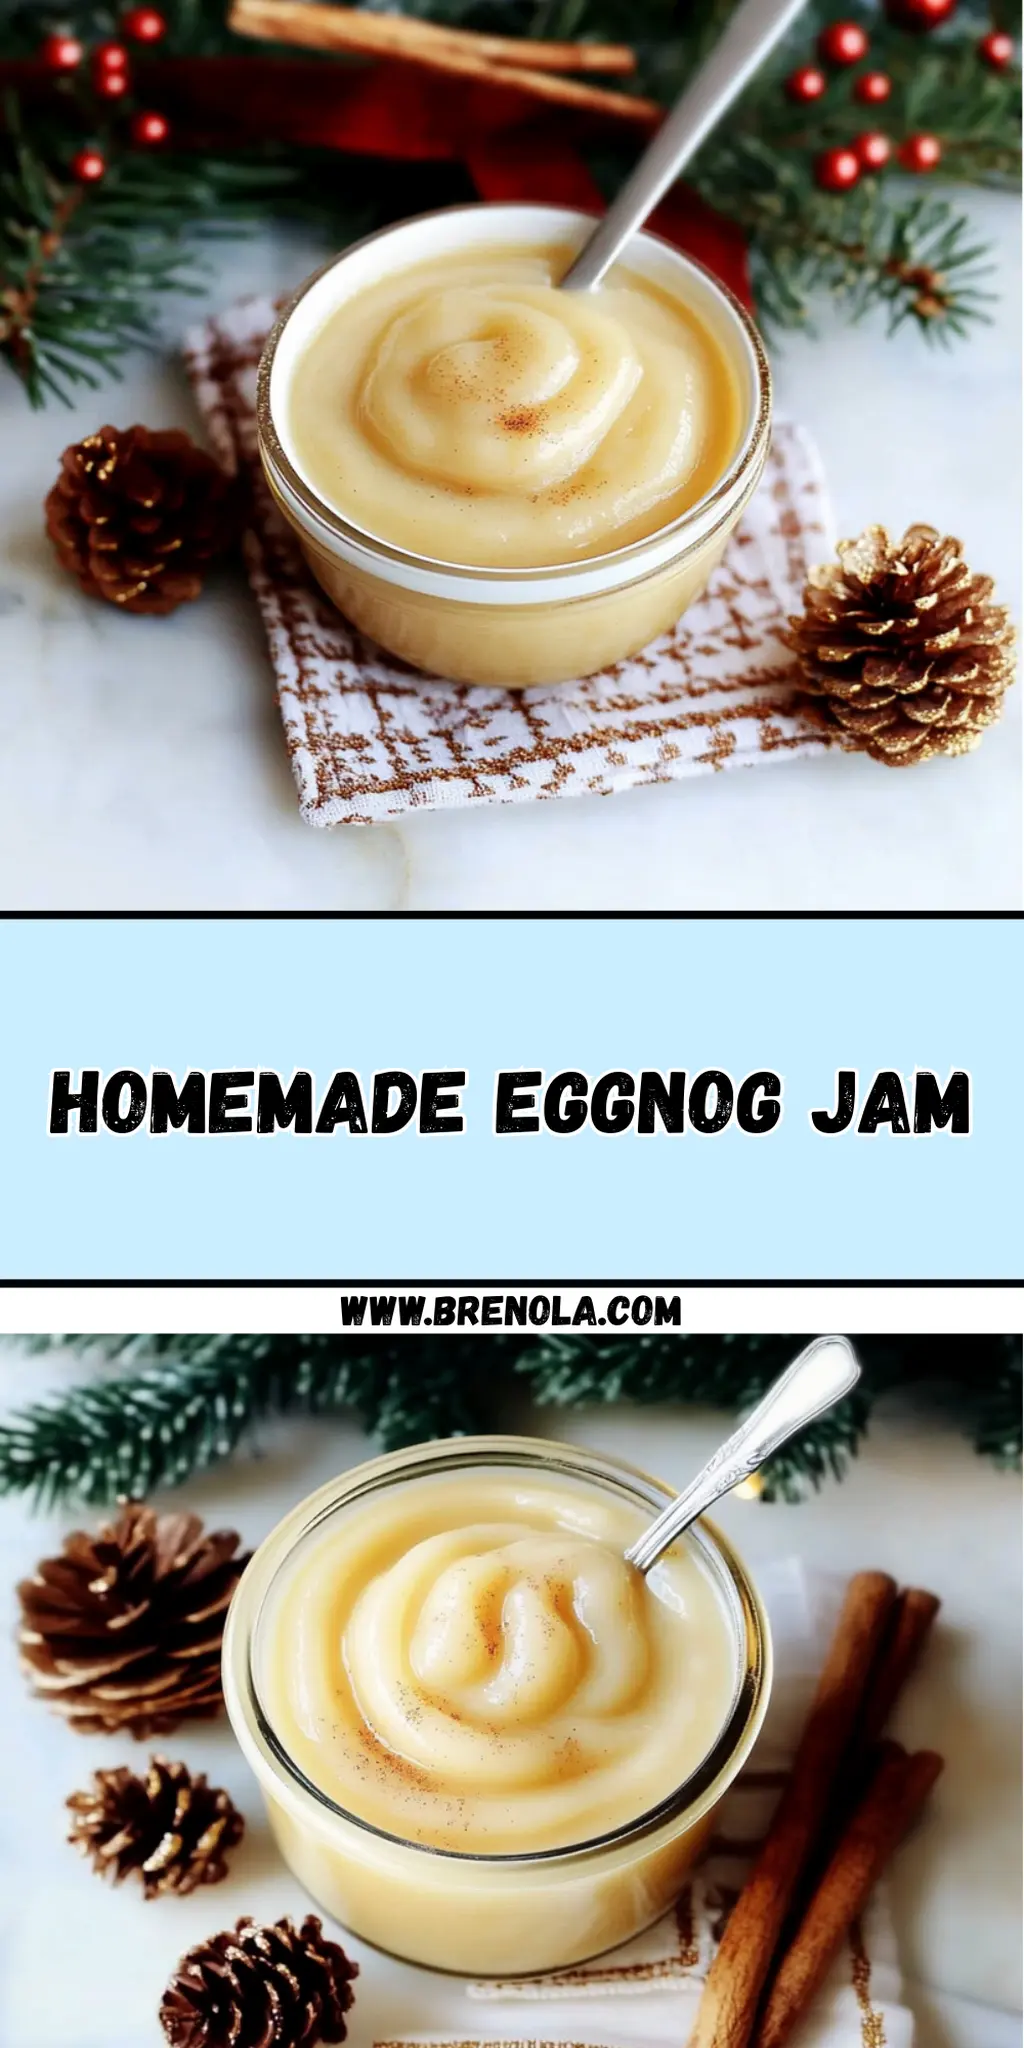
At the end of a long day, there's nothing quite like the comforting hug of familiar flavors, right? When I first tasted homemade eggnog jam at a holiday gathering, it was like unwrapping a cozy blanket on a chilly evening. The sweet aroma of nutmeg and cinnamon mixed with creamy vanilla takes me back to joyous celebrations with loved ones.
This delightful treat isn’t just for the holidays; it can transform your breakfast spread or elevate your desserts any time of the year. Best of all, making homemade eggnog jam is incredibly simple! In just 20 minutes, you can whip up a batch that’s as versatile as it is delicious.
Imagine spreading this luxurious jam on warm toast, mixing it into oatmeal, or even dolloping it on your favorite dessert. If you’re ready to escape the mundane fast food cycle and indulge in something truly homemade, let’s dive into this delicious recipe that promises to bring a little magic to your kitchen!
Why You'll Love This Homemade Eggnog Jam
- You will love how easy it is to prepare this delightful jam in just 20 minutes, making it a perfect option for busy mornings or last-minute gatherings.
- The rich flavors of nutmeg, cinnamon, and vanilla create a taste sensation that will transport you right to the holiday spirit, no matter the season.
- Its versatility means you can enjoy it in ways beyond breakfast; try it on desserts or in baked goods for a unique twist.
- The beautiful, creamy texture of the jam makes for an appealing presentation that will impress friends and family at any occasion.
Homemade Eggnog Jam Ingredients
Get ready to create this magical treat with just a few simple ingredients!
For the Base
- 4 egg yolks – these create the rich, custard-like texture that defines your homemade eggnog jam.
- ¾ cup granulated sugar – adds the perfect sweetness to balance the spices.
- 2 cups whole milk – for creaminess; you can substitute with almond milk for a dairy-free version.
For Thickening
- 3 tablespoons cornstarch – ensures your jam thickens beautifully; it can be replaced with arrowroot powder if needed.
For Flavoring
- ½ teaspoon ground nutmeg – delivers that classic eggnog flavor; freshly grated nutmeg amps up the taste!
- ¼ teaspoon ground cinnamon – pairs wonderfully with nutmeg, adding warmth and depth.
- 1 teaspoon vanilla extract – for a fragrant, comforting note that complements the spices.
For Finishing Touch
- 2 tablespoons butter – adds a velvety richness and glossy finish to your eggnog jam.
Enjoy making this delicious Homemade Eggnog Jam, a versatile delight ready to elevate your breakfast or dessert experience!
How to Make Homemade Eggnog Jam
-
Whisk Together: In a medium saucepan, off the heat, whisk together the egg yolks and granulated sugar until the mixture is pale and smooth. This step is essential for a creamy texture.
-
Incorporate Milk: Gradually whisk in the whole milk, ensuring it blends seamlessly with the egg mixture. Sift in the cornstarch, mixing until fully combined for a luscious base.
-
Cook the Mixture: Place the saucepan over medium heat and whisk constantly. Cook until the mixture thickens into a custard-like consistency, which should take about 5-7 minutes. You'll know it's ready when it coats the back of a spoon.
-
Add Spices: Remove the saucepan from the heat and stir in the ground nutmeg, cinnamon, and vanilla extract. This is where your homemade eggnog jam starts to come alive with holiday flavors!
-
Melt the Butter: Add the butter to the mixture and stir until it melts and creates a glossy finish. This step adds that velvety richness everyone loves!
-
Cool and Store: Let the jam cool slightly before transferring it to clean jars. Refrigerate until fully cooled and thickened. Your homemade eggnog jam is now ready to be enjoyed!
Optional: Serve with warm toast for an indulgent treat.
Exact quantities are listed in the recipe card below.
What to Serve with Homemade Eggnog Jam?
Indulge in a cozy culinary experience that perfectly compliments the festive charm of your jam.
- Warm Toast: The ideal canvas for your homemade eggnog jam, this simple pairing allows the creaminess to shine through.
- Fluffy Pancakes: A drizzle of this jam on breakfast pancakes elevates them to a whole new level of deliciousness. The spices harmonize beautifully with the fluffy texture.
- Greek Yogurt: The tartness of Greek yogurt balances the sweetness of the jam, creating a delightful contrast perfect for a light treat.
- Spiced Cookies: Enjoying your eggnog jam with spiced gingerbread or snickerdoodle cookies is like a holiday hug for your tastebuds!
- Vanilla Ice Cream: A scoop of velvety vanilla ice cream topped with the jam creates a dreamy dessert; the warmth of the jam melts slightly into the ice cream for a blissful combination.
- Oatmeal: Bringing a touch of holiday cheer to your morning, a spoonful of eggnog jam mixed into warm oatmeal makes for a comforting breakfast.
- Chai Latte: Pairing your jam with a warmly spiced chai latte enhances the cozy flavors, making every sip feel like a festive celebration.
- Cheese Platter: Alongside soft cheeses like brie or mascarpone, the jam adds a sweet note that contrasts beautifully with savory flavors.
- Shortbread Cookies: The buttery crunch of shortbread cookies cradling the jam creates a delightful texture explosion in every bite.
How to Store and Freeze Homemade Eggnog Jam
Fridge: Store your homemade eggnog jam in an airtight container in the refrigerator for up to 2 weeks. This will keep it fresh and ready for your next breakfast or dessert.
Freezer: If you'd like to store your jam for longer, freeze it in freezer-safe containers for up to 3 months. Leave some space at the top of the container for expansion as it freezes.
Thawing: To enjoy your frozen homemade eggnog jam, simply transfer it to the fridge and let it thaw overnight. You can also use the microwave in short bursts, stirring in between, until it's warm and spreadable.
Reheating: If you prefer your jam warm, gently heat it on the stove over low heat, stirring frequently to prevent burning. Enjoy spreading that cozy flavor!
Make Ahead Options
These Homemade Eggnog Jam options are perfect for busy cooks looking to save time without sacrificing flavor! You can prepare the entire mixture up to 24 hours in advance; simply follow the cooking instructions, cool it slightly, and then transfer it to clean jars. Allow it to refrigerate overnight so that it thickens beautifully. To maintain the delicious quality, ensure the jars are sealed tightly in the fridge. When you’re ready to enjoy your homemade eggnog jam, just bring it to room temperature and stir gently before serving. This way, you’ll always have a delightful treat on hand for breakfast or dessert, effortlessly elevating your meals!
Homemade Eggnog Jam Variations
There are so many delightful ways to customize your eggnog jam, making it uniquely yours!
-
Dairy-Free: Substitute whole milk with almond or oat milk for a creamy, dairy-free version that still delivers delicious flavor.
-
Spice Lovers: Add a pinch of ground ginger or a dash of allspice for an exciting twist that enhances the warmth of your jam.
-
Maple Sweetened: Swap granulated sugar for pure maple syrup to create a rich, earthy sweetness that pairs beautifully with the spices.
-
Citrusy Zest: Incorporate a teaspoon of orange or lemon zest to brighten the flavors and add a refreshing twist on traditional eggnog.
-
Nutty Addition: Stir in ¼ cup of finely chopped pecans or walnuts before cooling for a delightful crunch and nutty flavor.
-
Caramel Drizzle: Fold in a few tablespoons of caramel sauce just before pouring into jars for a decadent, dessert-like spread.
-
Spicy Kick: For those who love heat, add a pinch of cayenne pepper or ground ginger for a surprising warmth that complements the sweetness.
-
Vanilla Bean Upgrade: Replace vanilla extract with the seeds from half a vanilla bean for a luxurious and aromatic flair.
These variations allow you to unleash your creativity and make this homemade eggnog jam a personal favorite!
Chef's Helpful Tips
- When making Homemade Eggnog Jam, ensure your egg yolks and sugar are whisked together until pale and smooth to achieve the best texture.
- Avoiding the introduction of any heat in the first steps helps maintain the creaminess of your custard base.
- Whisk constantly during cooking to prevent lumps and ensure a silky finish as the mixture thickens.
- Remember to let the jam cool slightly before transferring it to jars, as this helps it thicken perfectly once refrigerated.
Homemade Eggnog Jam Recipe FAQs
How do I select ripe ingredients for Homemade Eggnog Jam?
Absolutely! For the best results, ensure your egg yolks are fresh and bright in color. When choosing whole milk, opt for high-quality full-fat options for a creamier consistency, and check for any expiration dates on the packaging to guarantee freshness.
How should I store Homemade Eggnog Jam, and how long will it last?
Store your homemade eggnog jam in an airtight container in the refrigerator where it will stay fresh for up to 2 weeks. It's a good idea to use clean utensils each time you scoop to prevent spoilage. Enjoy it during this time for maximum flavor!
Can I freeze Homemade Eggnog Jam, and how?
Certainly! To freeze your homemade eggnog jam, transfer it to freezer-safe containers, leaving some space at the top for expansion—this is crucial as liquids expand when frozen. It will keep well for up to 3 months. Just remember to label your containers with the date for easy tracking!
What are some common troubleshooting tips for Homemade Eggnog Jam?
If your jam isn't thickening, ensure you whisk it constantly while cooking to avoid lumps. If clumps do form, you can strain the mixture through a fine-mesh sieve before letting it cool. Always check the cooking duration—aim for the custard-like consistency that coats the back of a spoon for ideal thickness.
Can my pets enjoy Homemade Eggnog Jam?
While the ingredients are usually safe, including eggs and milk, it's best to avoid giving homemade treats to pets. High sugar levels and spices may not agree with them. Always consult your veterinarian for specific dietary advice regarding your furry friends.
Is Homemade Eggnog Jam suitable for people with allergies?
Great question! This recipe contains eggs and dairy, so it's not suitable for those with egg or lactose intolerances. However, you can substitute the milk with a dairy-free alternative like almond or coconut milk. Be sure to check any flavorings for potential allergens as well.
Homemade Eggnog Jam
Ingredients
Equipment
Method
- In a medium saucepan, off the heat, whisk together the egg yolks and granulated sugar until pale and smooth.
- Gradually whisk in the whole milk, ensuring it blends seamlessly with the egg mixture. Sift in the cornstarch, mixing until fully combined.
- Place the saucepan over medium heat and whisk constantly. Cook until the mixture thickens into a custard-like consistency, about 5-7 minutes.
- Remove from heat and stir in the ground nutmeg, cinnamon, and vanilla extract.
- Add the butter to the mixture and stir until it melts and creates a glossy finish.
- Let the jam cool slightly before transferring to clean jars. Refrigerate until fully cooled and thickened.


Leave a Reply