There's a certain whimsy in the air whenever cake pops come to the table, don’t you think? Imagine hosting a casual gathering or simply treating your loved ones to a delightful surprise. In that moment, the vibrant red velvet cake pops become not just a dessert, but a centerpiece of joy and excitement. These little bites of decadence are so easy to whip up that you'll find yourself making them time and again.
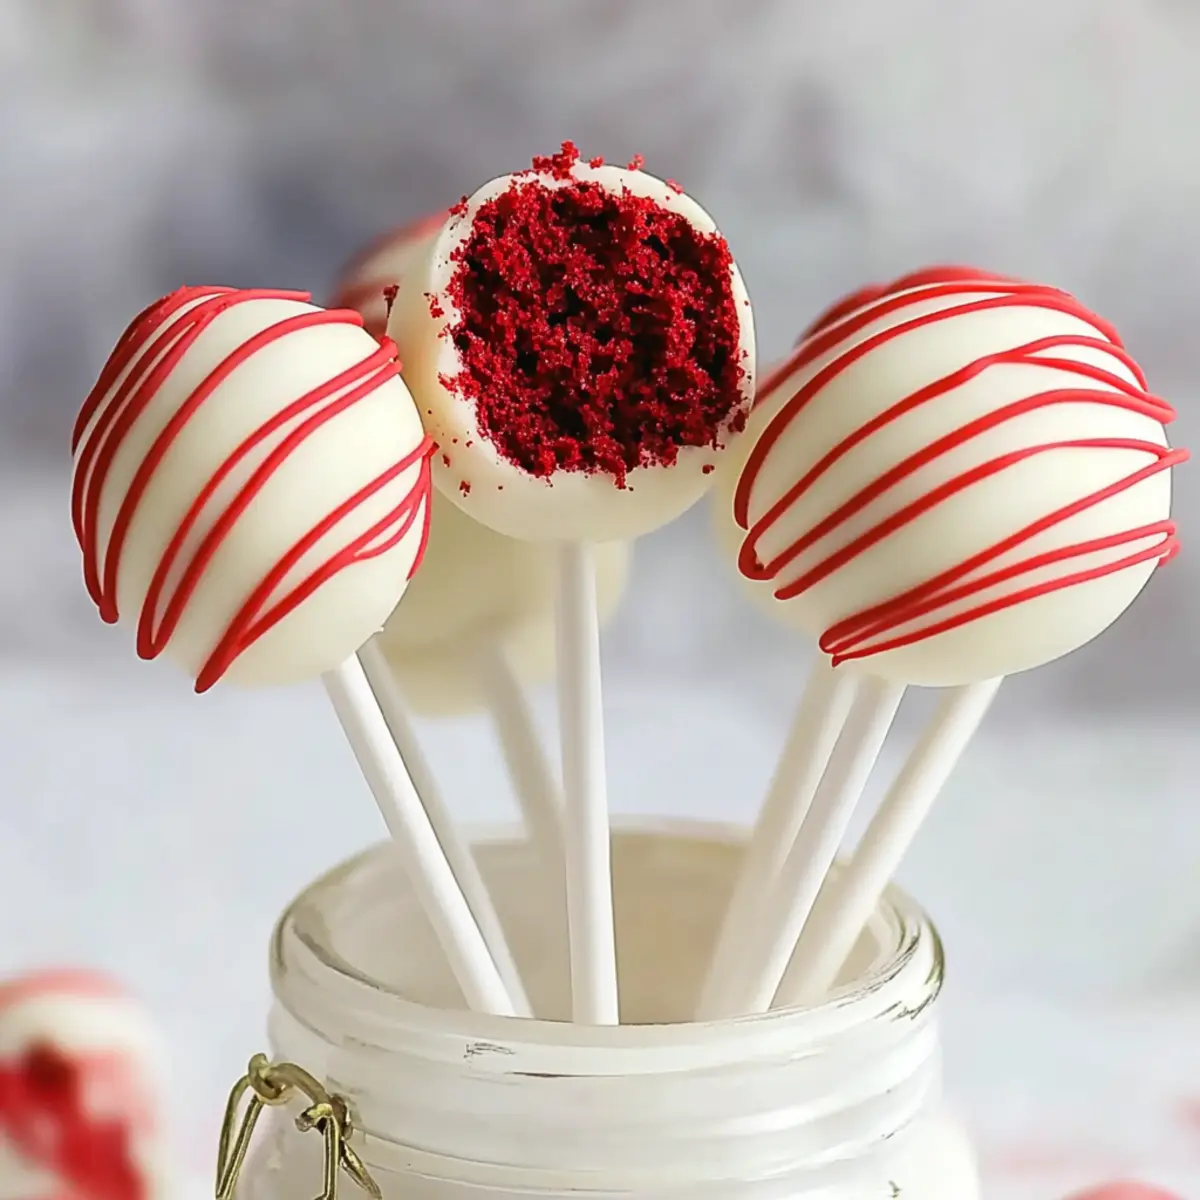
I was inspired to create these cake pops after spotting a colorful display at a bakery—it looked so inviting! They’re not just visually stunning with their ruby-red hue, coated in silky white candy melts and topped with sprinkles; they’re also a fantastic way to breathe new life into leftover cake or satisfy a sweet tooth craving without the fuss of a full dessert.
Packed with that signature cream cheese flavor and oh-so-satisfying to eat, these red velvet cake pops are perfect for sharing—and trust me, they’ll disappear quickly! Let me guide you through the process so you can create your own batch of these delightful treats.
Why You'll Love This Red Velvet Cake Pops
- This red velvet cake pops recipe is not only incredibly easy to make but also delivers a delightful flavor that will impress your guests.
- The vibrant red color combined with creamy cream cheese frosting and a smooth candy coating creates a visually stunning treat that looks as good as it tastes.
- These cake pops are truly versatile; they can be customized with your favorite sprinkles or enjoyed plain for a classic touch.
- With a total preparation time of just over an hour, these delicious bites are a time-saving solution for any gathering, ensuring you'll have a crowd-pleasing dessert that everyone will enjoy.
Red Velvet Cake Pops Ingredients
Delve into the delightful components of these cake pops!
For the Cake Mixture
- Red velvet cake mix – the star of the show that brings that signature red hue and chocolaty flavor.
- Canned cream cheese frosting – adds that luscious, creamy texture that complements the cake perfectly.
For the Coating
- White candy melts – provides a sweet, smooth coating that envelops your cake pops for that irresistible finish.
- Crisco shortening – helps achieve a glossy finish for your coating and makes it easier to dip!
For Decoration
- Sprinkles (optional) – these add a fun, festive touch to your cake pops if you want to enhance their visual appeal!
With these ingredients ready to go, you’re just a step away from creating your stunning red velvet cake pops!

How to Make Red Velvet Cake Pops
-
Bake the cake mix according to the package instructions, then cool completely on a wire rack. This step is vital for achieving a moist texture that holds well when formed into pops.
-
Crumble the cooled cake into fine pieces in a large bowl, ensuring it resembles sand. This will create a smooth base for your cake pops that integrates well with the frosting.
-
Mix in the cream cheese frosting until fully blended. You should have a moldable, slightly sticky dough that clumps together nicely for forming your pops.
-
Form the mixture into 1-inch balls and place them on a parchment-lined baking sheet. Aim for uniformity so they all cook evenly and look delightful when finished.
-
Freeze the balls for 15 minutes. This step will help them keep their shape while dipping and make for a neater look once coated.
-
Melt the candy melts with Crisco in a microwave-safe bowl, starting with 30-second intervals and stirring in between. When smooth and glossy, you’re ready for dipping!
-
Dip one end of a lollipop stick into the melted candy and gently insert it halfway into a cake ball. This will help secure the stick to the ball better.
-
Coat the cake pop in the candy melts, letting any excess drip off. Swirl it gently to ensure an even coating for that beautiful finish.
-
Decorate with sprinkles if desired, while the coating is still wet. This adds a charming visual appeal and extra sweetness to each bite!
-
Place the coated pops upright in a styrofoam block or cup to set. Allow them to harden completely before serving for that perfect crunch when you bite in.
Optional: For a fun twist, drizzle melted chocolate over the top as an extra decoration.
Exact quantities are listed in the recipe card below.
What to Serve with Red Velvet Cake Pops?
Indulging in delightful red velvet cake pops opens the door to a world of exciting pairing possibilities that elevate your dessert experience.
-
Creamy Vanilla Ice Cream: The cool creaminess of vanilla ice cream contrasts beautifully with the rich flavor of the cake pops, creating a perfect balance.
-
Fresh Berries: Juicy strawberries, raspberries, or blueberries add a refreshing burst of flavor that complements the sweetness of the cake pops. Plus, their vibrant colors enhance your dessert table!
-
Chocolate Dipping Sauce: A warm, velvety chocolate sauce drizzled over the pops brings out the chocolate notes in the red velvet, creating a luxurious treat.
-
Homemade Whipped Cream: Light and airy whipped cream adds a touch of elegance and pairs wonderfully with the denser cake pop texture for a delightful mouthfeel.
-
Sparkling White Wine: A chilled glass of sparkling wine brings a festive touch, enhancing the celebration that red velvet cake pops naturally bring to any occasion.
-
Charcuterie Board: Include your red velvet cake pops on a charcuterie board with cheeses and nuts for a fun dessert display that excites the taste buds with savory and sweet contrasts.
-
Coffee or Espresso: A rich cup of coffee or espresso balances the sweetness and adds a warm, cozy vibe, making it the perfect dessert companion for any gathering.
-
Chocolate Chip Cookies: Pairing these cake pops with chewy chocolate chip cookies brings a nostalgic touch and adds another texture to savor, delighting both kids and adults alike.
-
Lemonade or Iced Tea: Refreshing beverages like lemonade or iced tea can cleanse the palate between bites, keeping your taste buds engaged with every luscious cake pop.
How to Store and Freeze Red Velvet Cake Pops
Room Temperature: Keep cake pops in an airtight container at room temperature for up to 3 days. This helps maintain their freshness and prevents them from drying out.
Fridge: Store cake pops in the fridge for up to a week. Make sure they are in an airtight container to avoid absorbing any moisture or odors from the fridge.
Freezer: For longer storage, freeze cake pops in a single layer, then transfer to a freezer-safe bag for up to 3 months. Thaw in the refrigerator before serving for optimal taste and texture.
Reheating: If desired, allow the cake pops to come to room temperature before serving. Avoid reheating in the microwave to retain their coating and structure.
Make Ahead Options
These Red Velvet Cake Pops are perfect for busy home cooks looking to save time! You can prepare the cake mixture up to 24 hours in advance—simply bake the red velvet cake according to the package instructions, allow it to cool, and then crumble it into fine pieces. Store the crumbled cake in an airtight container in the refrigerator, which helps maintain moisture. When you’re ready to dive into fun, mix in the cream cheese frosting, form into balls, and freeze for about 15 minutes before dipping. To finish, melt your candy coating and simply dip the cake pops right before serving, ensuring that they are just as delightful and fresh!
Red Velvet Cake Pops Variations
Feel free to unleash your creativity and customize these delightful cake pops!
-
Gluten-Free: Substitute the red velvet cake mix with a gluten-free blend to cater to those with dietary restrictions.
-
Dark Chocolate Coating: Swap white candy melts for dark chocolate; the rich flavor complements the creaminess of the frosting beautifully. Your taste buds will thank you!
-
Nutty Crunch: Add crushed nuts to the cake mixture for an unexpected texture twist that elevates the pops—this adds a delightful crunch in every bite.
-
Vegan-Friendly: Use a vegan cake mix and dairy-free frosting. You’ll still get that luscious flavor, plus it caters to all your vegan friends!
-
Lemon Zest Boost: Incorporate a teaspoon of lemon zest into the frosting for a refreshing citrus twist that brightens up the classic red velvet flavor.
-
Minty Freshness: Add a few drops of peppermint extract to the cake mixture for a minty twist; these cake pops take on a whole new holiday cheer!
-
Spicy Kick: Mix in a pinch of cayenne pepper for a subtle, surprising heat that contrasts with the sweetness of the icing.
-
Colorful Sprinkles: Go beyond traditional sprinkles! Try themed or multi-colored sprinkles to match your event, making them even more festive and fun.
Transform these red velvet cake pops into your own masterpiece—each bite tells your story!
Chef's Helpful Tips
- When making Red Velvet Cake Pops, ensure the cake is completely cooled before crumbling it to maintain moisture and texture.
- A common mistake is overmixing the cake and frosting mixture; aim for a well-blended but moldable consistency for easier shaping.
- To achieve a smooth and shiny coating, use Crisco shortening when melting the candy melts, and remember to stir frequently to avoid overheating.
- Timing is crucial, so allow the cake balls to freeze for the full 15 minutes to help them hold their shape when dipped.
Red Velvet Cake Pops Recipe FAQs
What is the best way to choose a red velvet cake mix?
Absolutely! When selecting a red velvet cake mix, look for a brand that has natural coloring and a rich chocolate flavor. Check the label for no artificial colors or preservatives for a more authentic taste. A good mix should have a nice balance of ingredients, such as cocoa and buttermilk powder, for the best flavor profile.
How should I store leftover red velvet cake pops?
You can store leftover cake pops in an airtight container at room temperature for up to 3 days. This keeps them fresh and helps prevent drying out. If you'd like to keep them longer, store them in the fridge for up to a week. Make sure they are well-sealed to maintain their texture and flavor.
Can I freeze red velvet cake pops?
Very! For freezing, first, place your cake pops in a single layer on a parchment-lined baking sheet. Freeze for about 1-2 hours until solid, then transfer them to a freezer-safe bag or airtight container for up to 3 months. When you’re ready to enjoy, simply thaw them in the fridge overnight, and they’ll taste as good as freshly made!
What can I do if my cake pops are cracking?
If your cake pops are cracking, it's often due to the cake mixture being too dry or freezing for too long. Ensure you’re incorporating enough cream cheese frosting into the crumbled cake to achieve a moldable consistency. If they're already frozen, let them sit for a few minutes before dipping in the candy coating. A smooth, even coating will help hide any imperfections!
Are there any allergen considerations for red velvet cake pops?
Definitely! If you’re concerned about allergens, always check the ingredient labels of the cake mix and frosting for potential allergens like gluten, dairy, or nuts. For a gluten-free version, opt for a gluten-free red velvet cake mix. Also, be mindful of any guests with dietary restrictions—let them know if you're using any specific ingredients that could affect them!
How can I customize my red velvet cake pops?
Feel free to get creative! You can add your favorite flavors by mixing in crushed nuts, flavored extracts, or even a bit of cocoa powder for a deeper chocolatey taste. When coating, try using different colored candy melts or sprinkling edible glitter instead of regular sprinkles for a fun twist. The more the merrier with your creations!
Red Velvet Cake Pops
Ingredients
Equipment
Method
- Bake the cake mix according to the package instructions, then cool completely on a wire rack.
- Crumble the cooled cake into fine pieces in a large bowl.
- Mix in the cream cheese frosting until fully blended.
- Form the mixture into 1-inch balls and place them on a parchment-lined baking sheet.
- Freeze the balls for 15 minutes.
- Melt the candy melts with Crisco in a microwave-safe bowl, stirring frequently.
- Dip one end of a lollipop stick into the melted candy and insert it into a cake ball.
- Coat the cake pop in the candy melts, letting any excess drip off and swirl gently.
- Decorate with sprinkles if desired, while the coating is still wet.
- Place the coated pops upright in a styrofoam block or cup to set.


Leave a Reply